Importing XLSX files
In this example we are going to make a job to import an XLSX-file. The XLSX file contains one TAB called ‘Customers’. Step 1 – 3 are done in SQL Server Management Studio.
Create a table to contain the filenames
You need to create a table to contain the filenames (path included) of the files that have to be imported. The fields in the table should contain the following information:
- File name: Filename and path to the file at the time of the import.
- Date: Fill this field when the import was successful
- Type: Indication of the type of import file
Example code:
SET ANSI_NULLS ON
GO

SET QUOTED_IDENTIFIER ON
GO

CREATE TABLE [dbo].[Custom Import Files](
	[ID] [int] IDENTITY(1,1) NOT NULL,
	[File name] [nvarchar](250) NULL,
	[Date] [datetime] NULL,
	[Type] [nvarchar](100) NULL
) ON [PRIMARY]
GO
Table with the contents of the XLSX file
Now create a new table to contain the contents of the XLSX file we are going to import. The fields in the file should be large enough to contain whatever is in your (test) file. All fields are created as NVARCHAR. Transformation to other formats will be done later in the process.
Example code:
SET ANSI_NULLS ON
GO

SET QUOTED_IDENTIFIER ON
GO

CREATE TABLE [dbo].[Custom Import XSLX data](
	[ID] [int] IDENTITY(1,1) NOT NULL,
	[Field1] [nvarchar](250) NULL,
	[Field2] [nvarchar](100) NULL,
	[Field3] [nvarchar](100) NULL,
	[Field4] [nvarchar](100) NULL,
	[Date] [nvarchar](10) NULL,
) ON [PRIMARY]
GO
Configuration
Next, create the configuration to select the files that should be imported. For example we are going to scan folder ‘E:\Data\Import\’ for files which names start with ‘MyImportFile’.
(remember that E: is not your local environment when you run this, it will be E: on the server where you run the software)
Make an entry in table [Tasks]
| ID | 2 | (Just an ID) |
| Batch ID | 10 | (ID to identify this action – this ID has to be unique) |
| Description | ‘Import of test file’ | (description of the process – not mandatory) |
| Source type | null | |
| Source name | ‘E:\Data\Import\MyImportFile*’ | |
| Clear destination | 0 | |
| Active | 1 | |
| Option | null | |
| Memo | null |
And the second entry [import]
| ID | 3 | |
| Batch ID | 30 | (same ID as in the [Tasks] table entry) |
| Description | ‘Import of test file’ | |
| Table name | ‘Custom Import Files’ | |
| Field name | ‘File name’ | |
| Source column | ‘File name’ | |
| Operation | nul | |
| Text | null | |
| Key | 1 |
And another table [import]
| ID | 4 | |
| Batch ID | 30 | (same ID as in the [Tasks] table entry) |
| Description | ‘Import of test file’ | |
| Table name | ‘Custom Import Files’ | |
| Field name | ‘Type’ | |
| Source column | null | |
| Operation | ‘=’ | |
| Text | ‘Test XSLX’ | |
| Key | 0 |
This is all the configuration needed. It will make the import task scan ‘E:\Data\Import\’ for files with a name that starts with ‘MyImportFile’. For every file that is found a record will be added to table ‘Custom Import File’ where the name of the file is placed in field [File name] and the field [Type] will be set to ‘Test XSLX’
All that is needed to do this in the import job is the ‘Import_Directory’ command (see step 6 Create a job to perform the import).
Specify the name of the file to be imported
For the next step we will use the MA!N Commands Window. We are going to specify what file has to be imported. We can retrieve this from the [Custom Import Files] table and need to update the [Tasks] table. The entry in [Tasks] has to be created once. This will be done by command that we create in MA!N and should look like this for example:
UPDATE	[dbo].[Tasks]
SET	[Source name] =	REPLACE	(	(	SELECT	TOP 1 [File name]
								FROM	[dbo].].[Custom Import Files]
								WHERE	[Date] is NULL
								AND [Type] = 'Test XSLX'
								ORDER BY	[ID]
							)
							, 'F:\Data'
							, ''
						)
						+ ':Customers'
WHERE	[ID] = 2
After this update the record in the [Tasks] table should look like this:
| ID | 2 |
| Batch ID | 20 |
| Description | ‘Import of XLSX test file’ |
| Source type | ‘Excel:False:False’ |
| Source name | ‘\Import\ MyImportFile.xlsx:Customers’ |
| Clear destination | 1 |
| Active | 1 |
| Option | NULL |
| Memo | NULL |
We replace ‘F:\Data’ with ‘ ‘ because MA!N will know that it should look in the Import folder.
Make entries in the [Import] table for all the columns in the XLSX file.
| ID | 5 | |
| Batch ID | 20 | (same ID as in the [Tasks] table entry) |
| Description | ‘Import of XLSX test file’ | (description of the process – not mandatory) |
| Table name | ‘Custom Import XSLX data’ | (Target table) |
| Field name | ‘Field1’ | (Column in target table) |
| Source column | 0 | (0 = first column) |
| Operation | null | |
| Text | null | |
| Key | 0 |
And the second entry
| ID | 6 | |
| Batch ID | 20 | (same ID as in the [Tasks] table entry) |
| Description | ‘Import of XLSX test file’ | (description of the process – not mandatory) |
| Table name | ‘Custom Import XSLX data’ | (Target table) |
| Field name | ‘Field2’ | (Column in target table) |
| Source column | 1 | (1 = second column) |
| Operation | null | |
| Text | null | |
| Key | 0 |
(in our example we need to add 5 entries in total to the [Import] table for this step, one for each column in the source table)
Create a job to perform the import
For this step you will go to the Jobs Window in MA!N (View > Configuration > Jobs). In this window we will select ‘NEW’. A window should pop-up where you can create the new job.
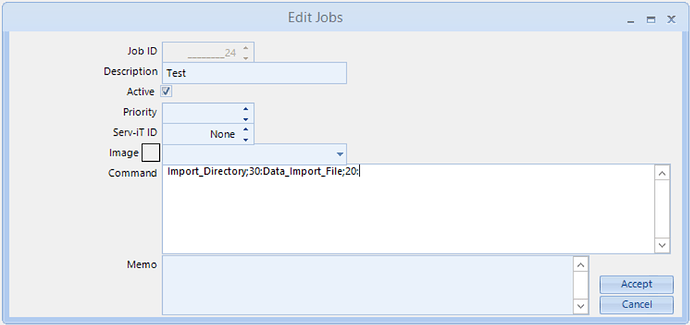
This command ensures that first step 3 is executed and then the steps 4 and 5. If it’s a large import file we can indicate that the process can use more time by specifying ;999 at the end.
Data_Import_File;20 -> Data_Import_File;20;999Add job to scheduler
The final step is to schedule the Job. To do this we will open the Jobs Scheduled Window ((View > Configuration > Jobs Scheduled). In this window we will select ‘NEW’. A window will pop-up where you can add the new job to the scheduler.